Paper Marbling

Not too far from our old house is a large building with the words, “Denver Bookbinding Company” on the side. I’d always wondered what they did exactly, and I noticed that there was smaller lettering that advertised classes.  As we drove by one day, I mentioned to Eric, “Hey, if you ever wanted to get me a present, you could buy me a class there.”

Next week, I get a certificate for a paper marbling class! Good husband.

I showed up a bit early to the class, which I was so glad I did.  It is SO COOL in there. They have so many unique, vintage bookbinding machines and presses.

IMG_1826

Big old book press

letters

letters

More cases of old letters. I just loved these

More cases of old letters. I just loved these

Old phone books, used for weights.  I love how small the Seattle phone book is.

Old phone books, used for weights. I love how small the Seattle phone book is.

IMG_1832

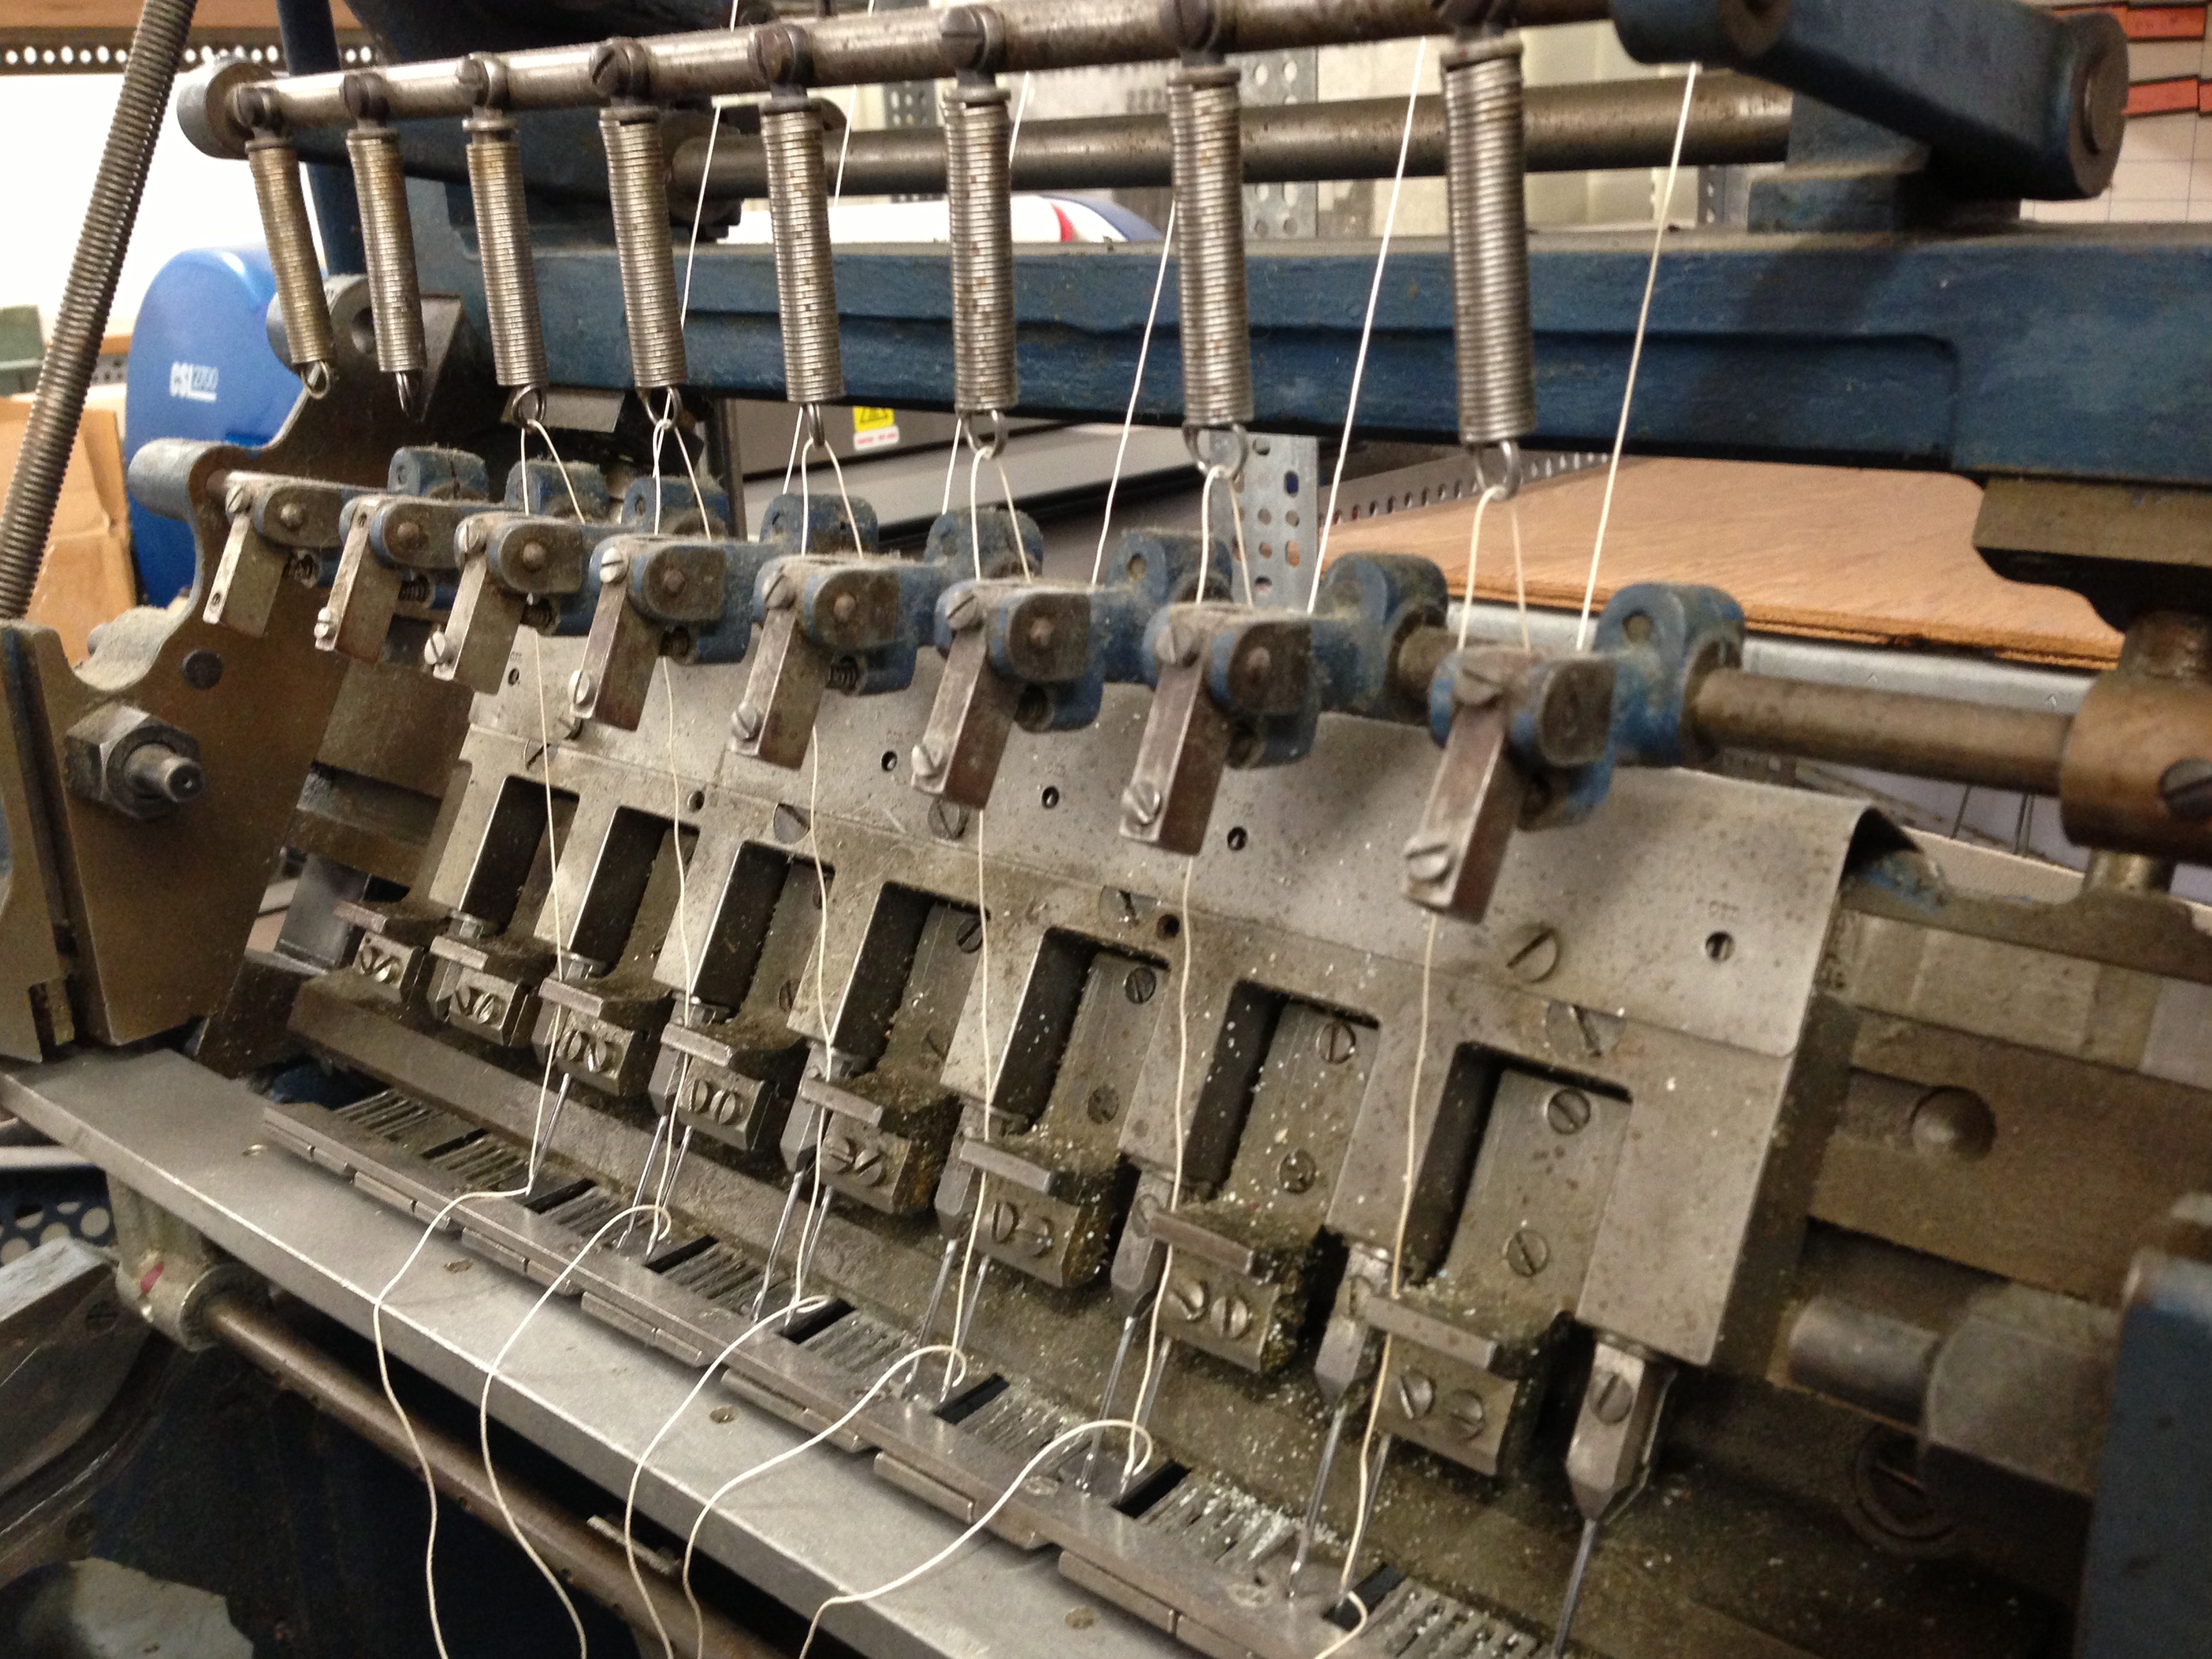
Book stitching machine

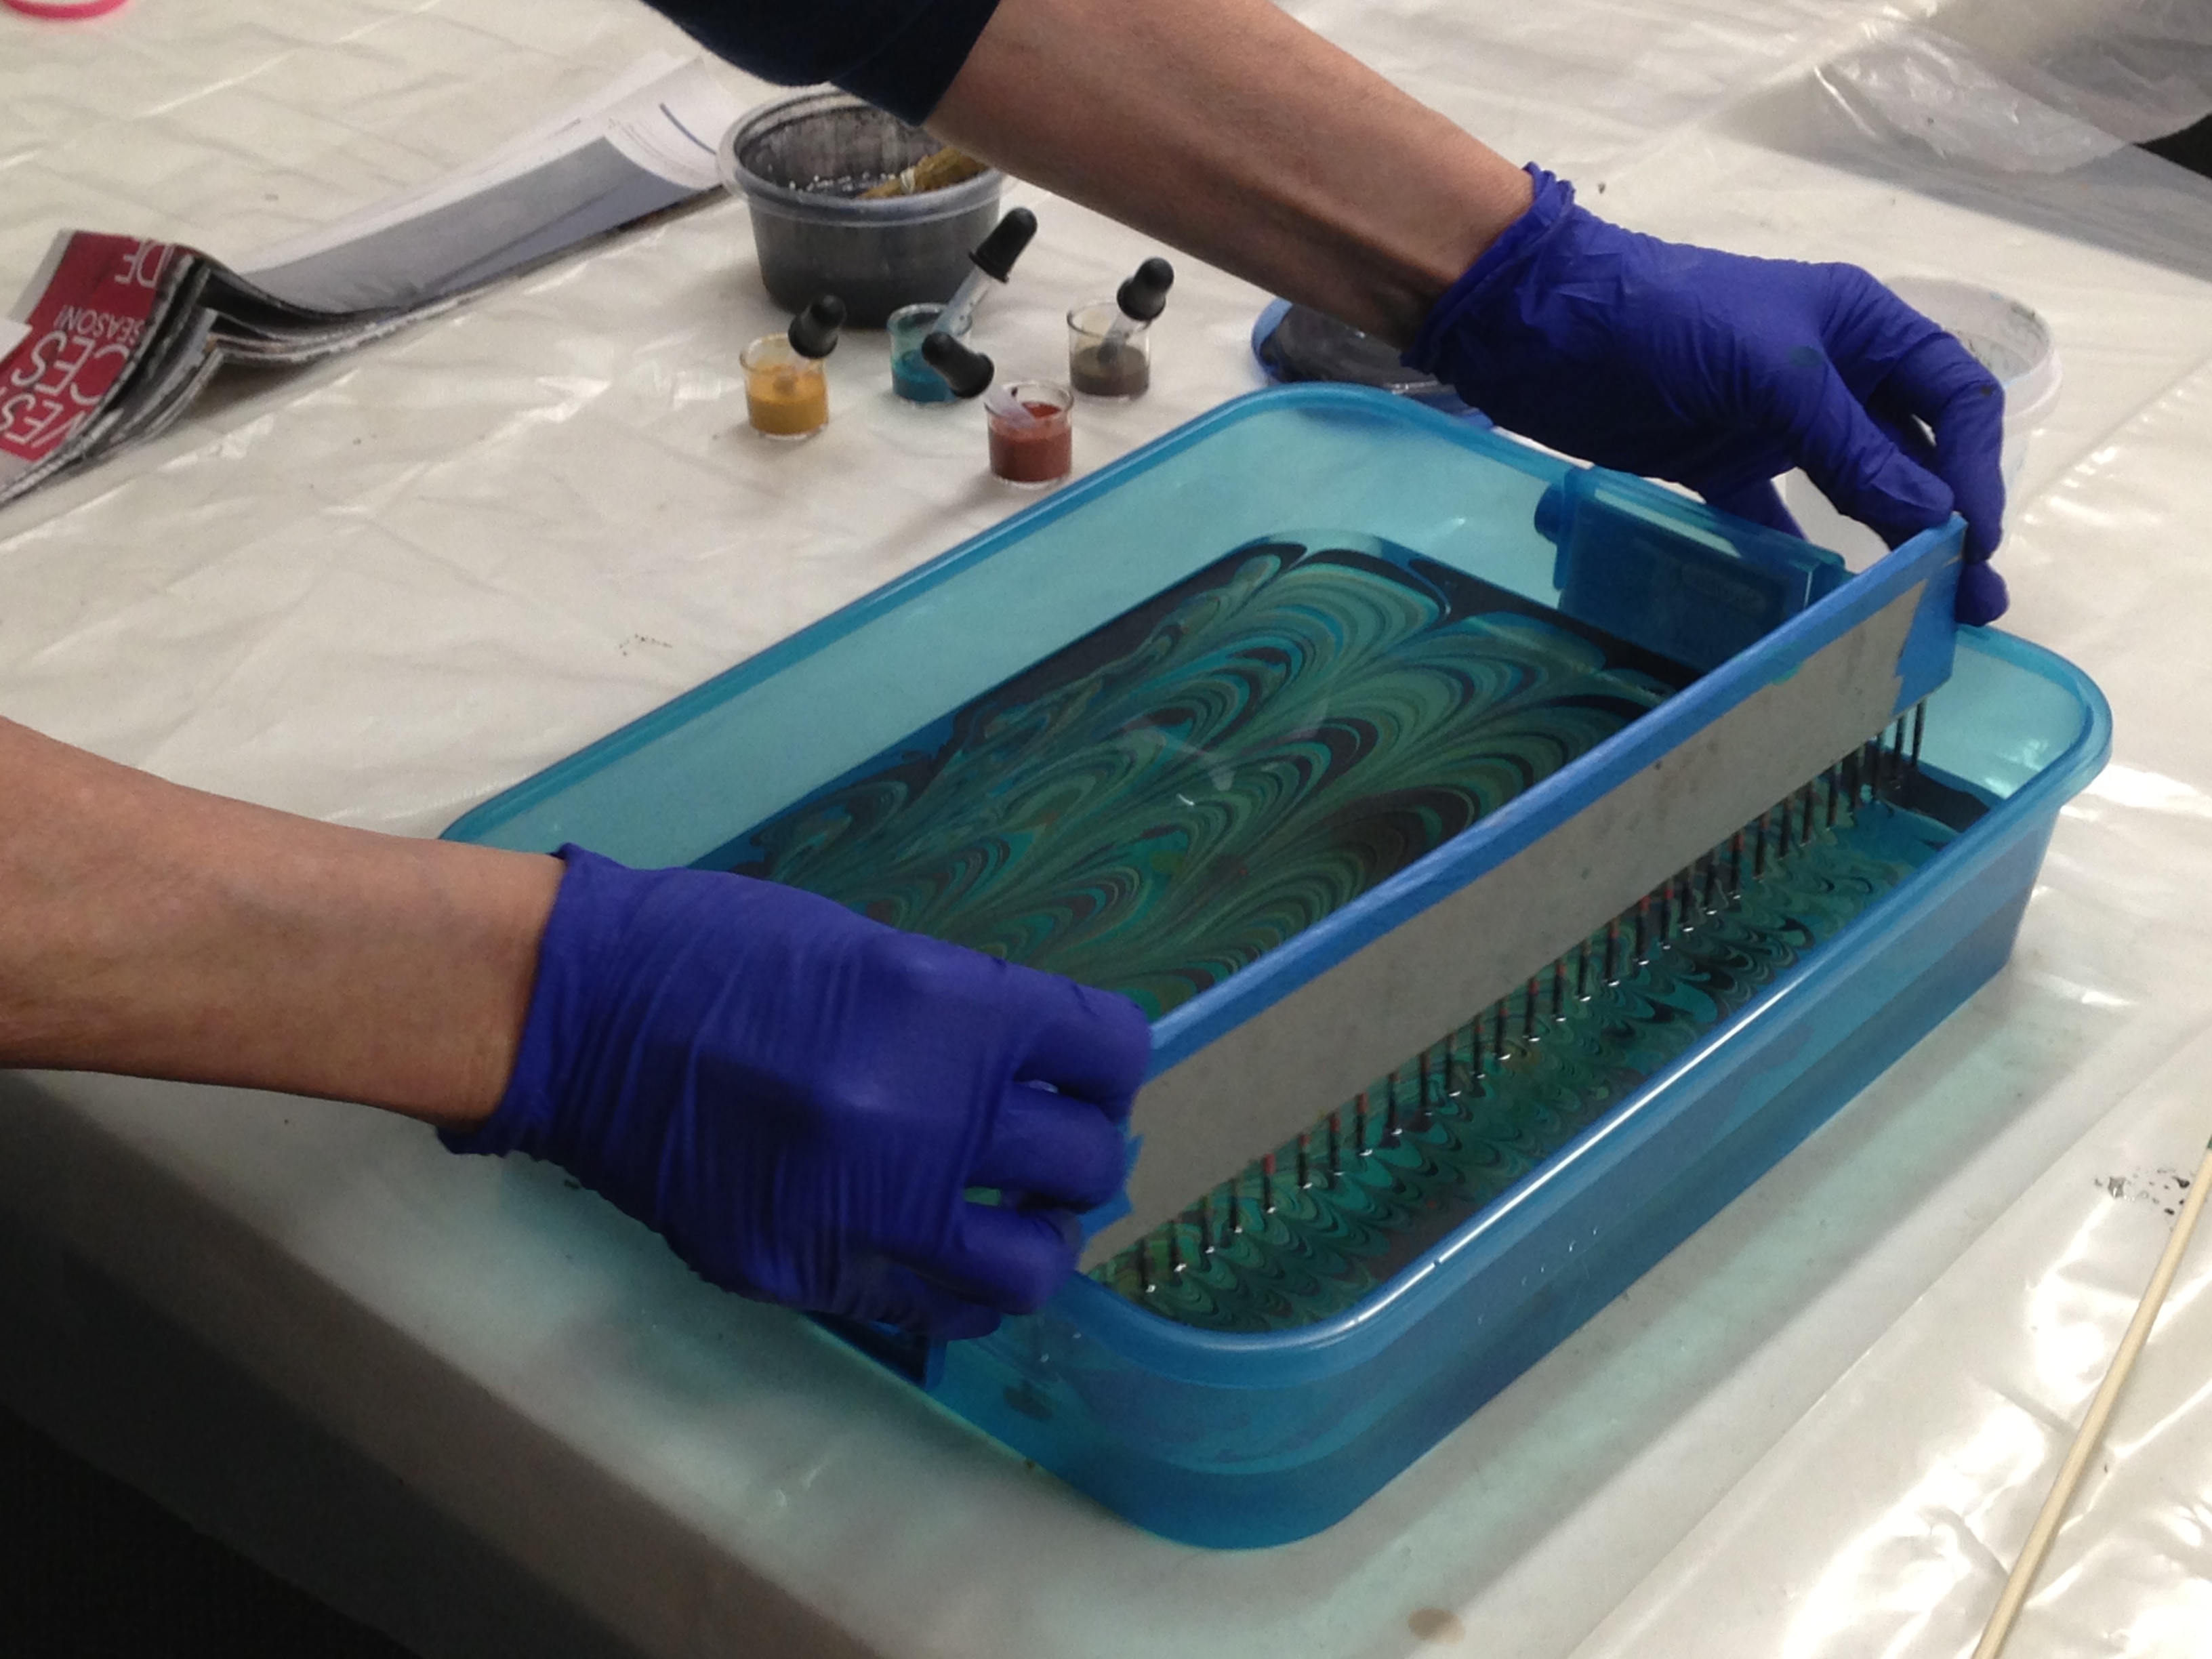
The class itself was so fun. Paper marbling works like so:

You have a specially made bath and float pigments on topIMG_1848

Then, you swirl and comb them into cool patterns

IMG_1852IMG_1855

Then, you lay a piece of prepared paper onto the surface, and when you pull it up,

IMG_1858

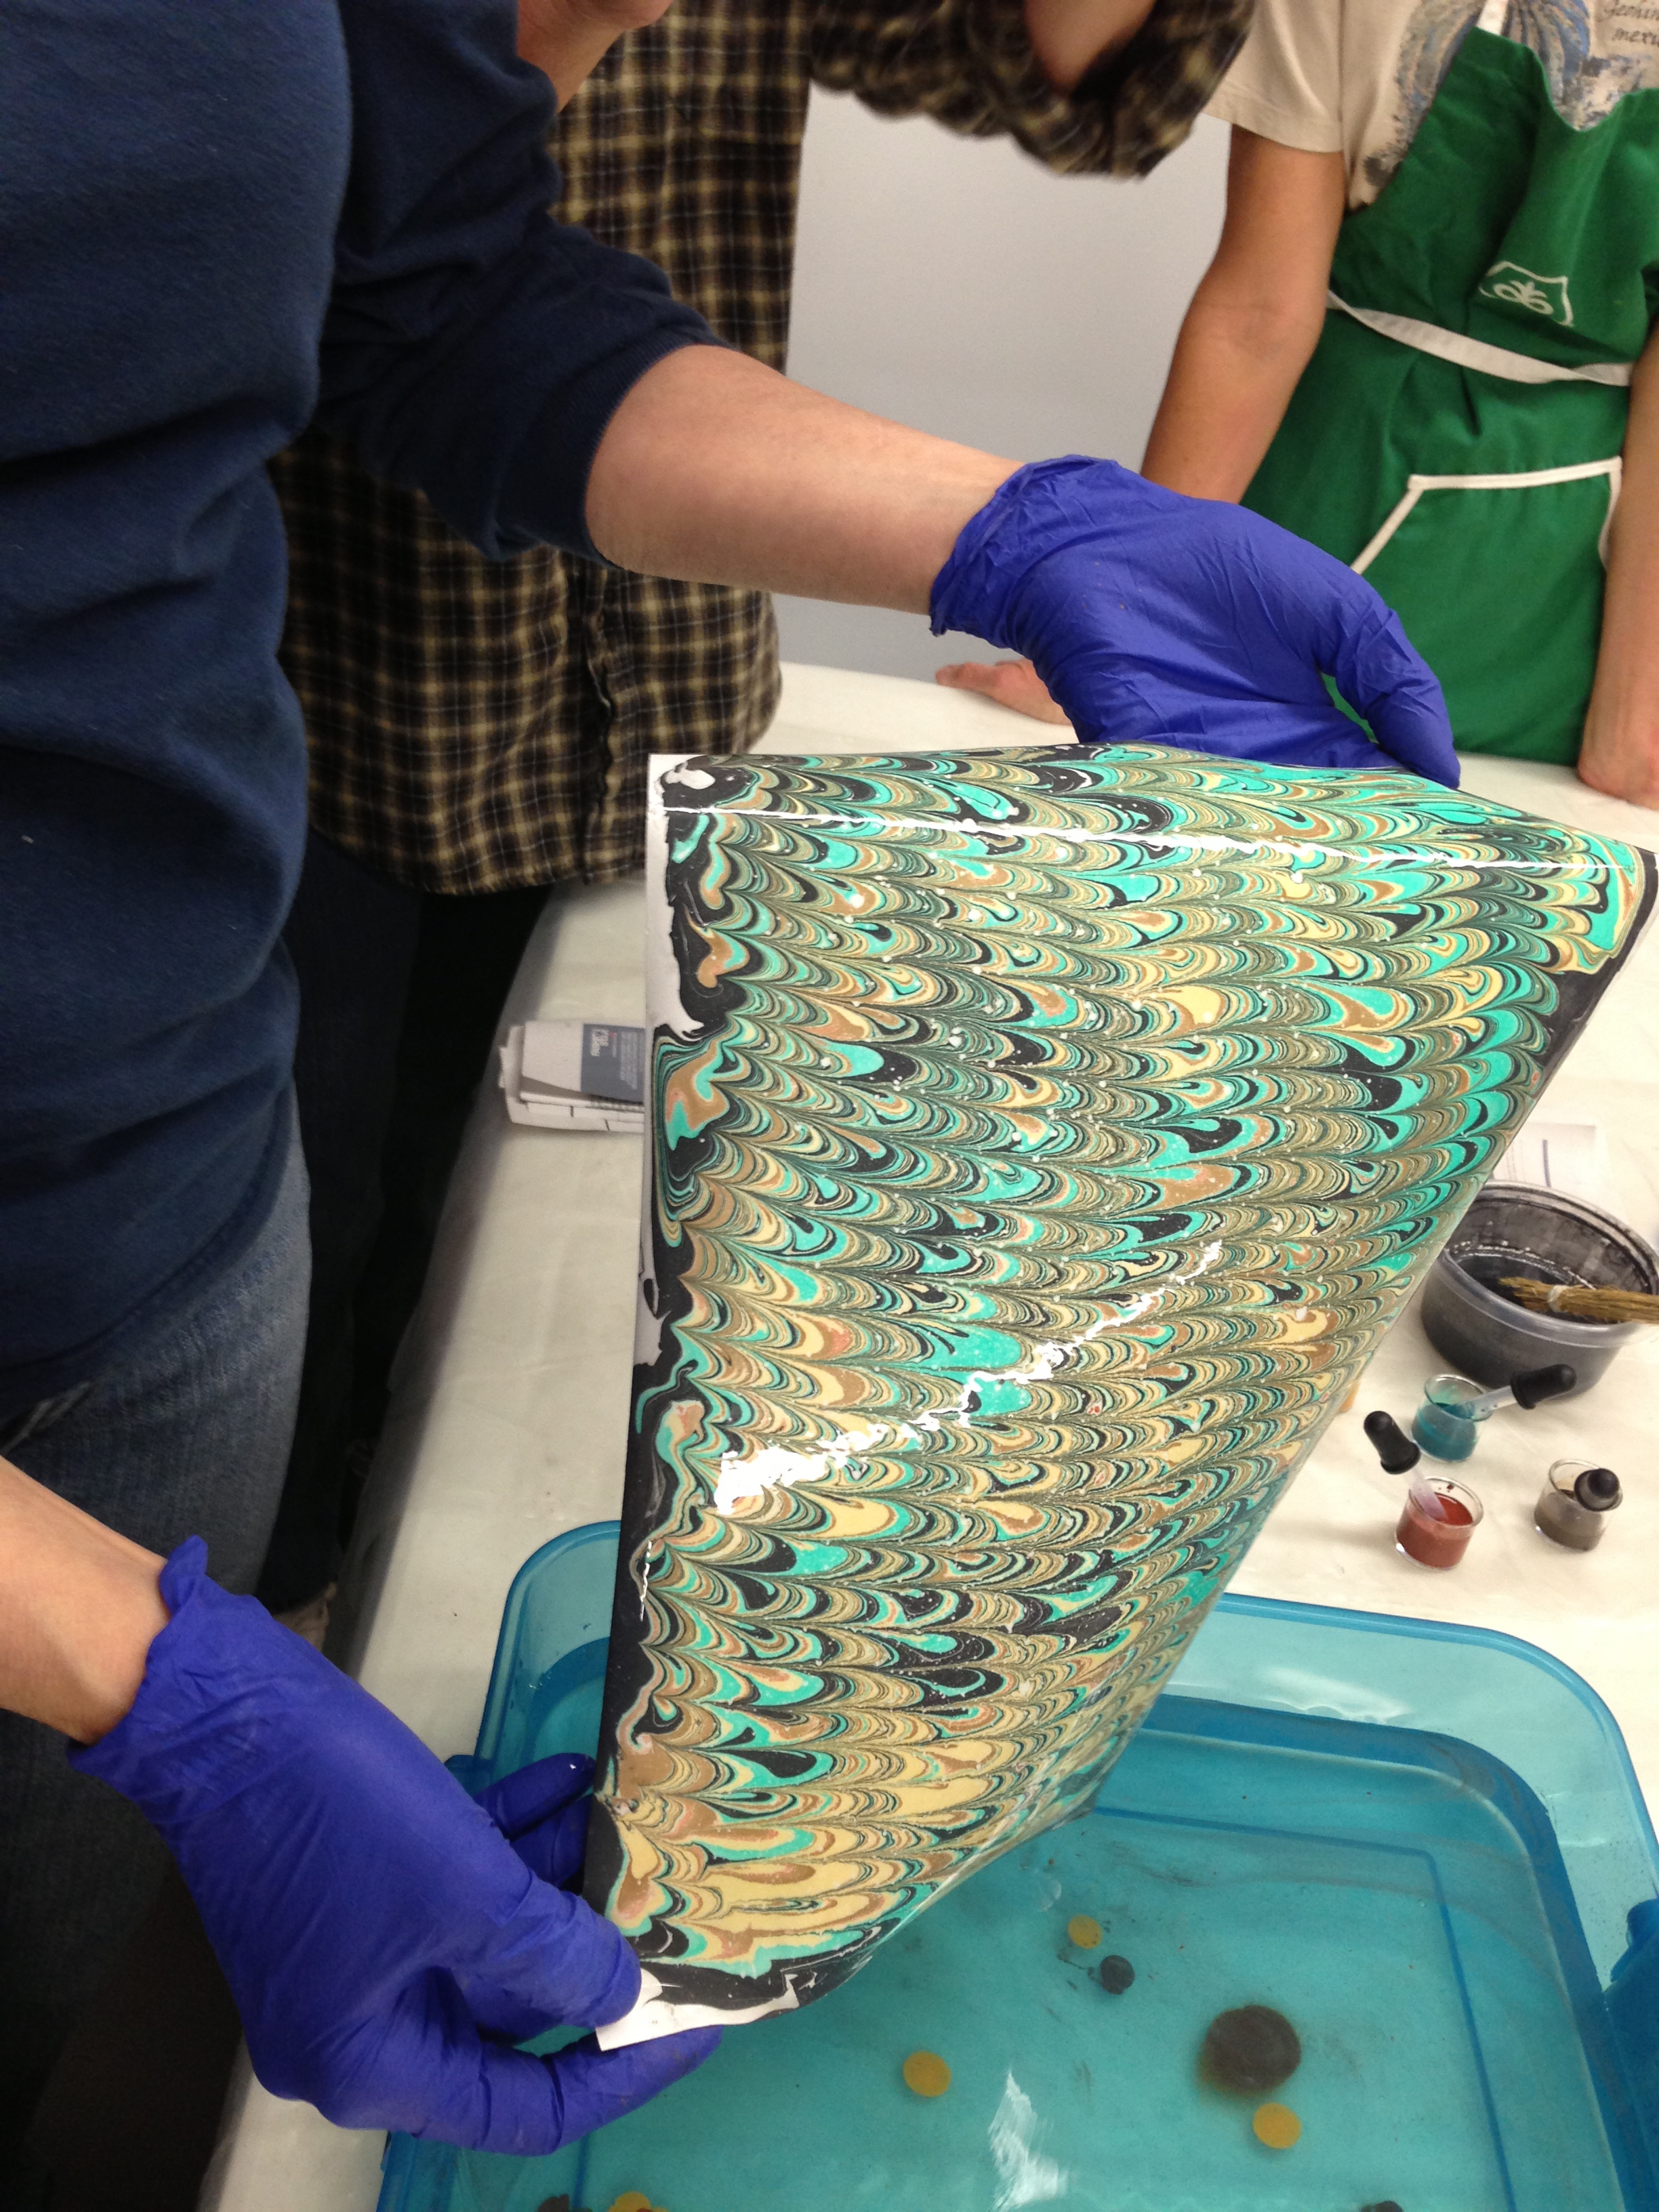
You have this beautiful, gorgeous marbled paper!

Here’s a few others I made

IMG_1864IMG_1865

And my personal favorite

IMG_1883

There are so many actual patterns and techniques out there to get very specific marble designs, which take a lot of skill and talent to do. I also learned that it’s an international craft-with differences in European and Japanese designs, for example.

The class was great-I hope to take an actual bookbinding class there someday.  Maybe I can use one of these gorgeous papers for endpapers in a homemade journal-how pretty would that be?

Here’s what I ended up with at the end of the day-now I need to think of creative ways to use them!

IMG_1885

Hi Tech/Low Tech

I was late to the iPhone. I have coveted one ever since they first came out, but held off on getting one because I didn’t want to be one of THOSE people who was constantly checking their phone in all situations.

Then I got a non-iphone smartphone, and it sucked. It froze constantly.  This meant that I was one of those people who was always staring at my phone but just watching it do NOTHING.  I was able to get out of my contract (without a penalty, ask me how if you need advice) and switch to the new iPhone, which I love.

As much as I love technology, I obviously love the handmade as well, so when I saw a diy cross-stitch phone case I knew I needed to have it. The next question was what to put on it? Well, I like birds, dammit. I don’t care if they’re cliche in the design world by now. And I have a son who’s name will forever be attached to a finch, so birds it was. (If a single one of you links to the Portlandia sketch, you will be immediately defriended.)

For the girl, I picked a little bluebird, which is a very, very loose association based on her nickname.  If we were going for a bird related to her personality, it would be…I don’t know. Perhaps a mockingbird? Loud, full of personality, bright, devoted to their own families yet unconcerned with other people? Hmmm… that would be keeping within a theme, bookwise.

I finished the birds first but it looked so plain and white and, well, there was no orange, but I was able to fix that with this cool variegated embroidery floss that I found at Fancy Tiger, and voilà!

I’m not entirely sure that it’s exactly what I was hoping for, but it’ll do for now and I’ll see about changing it in the future. The girl has already insisted that the beak of her bird be changed to purple, naturally.

A quick roundup of another high tech/low tech mix–my Kindle.  Again, I like the idea of the faux wood instead of the plastic that it actually is, and it also makes it easier to read in my opinion. I also don’t like the hard cases–I find them heavy, so to protect it I knitted a little sock out of scrap yarn, which does a serviceable job of keeping it unscratched. I tried a few fancy knitting motifs before I realized that I was spending far too much time and just went for some simple stripes.

The wood also serves as a form of camouflage, and can make the Kindle a bit tough to find sometimes.

As far as  next projects, it’s time for me to get started on a sweater that I promised to a friend about, oh, a year ago.  Will have updates on that soon!

Patches

My parents hate torn jeans.  When I was in high school, it was the heyday of grunge fashion and torn jeans were cool. You could, with torn jeans, pretend like you didn’t live in one of the more affluent neighborhoods of Fremont.  More likely, you paid good money for jeans that were already pre-torn in delicately artful ways.

My parents just thought torn jeans looked like you were poor. Of course, my parents’ disapproval only made me desperately wanted to wear them.  I never quite made it out of the house with torn jeans, and they ended up just getting tossed.

Now of course, I have a 6 year old boy, and 6 year old boys cannot seemingly live in the same universe with an intact pair of jeans. I swear, as soon as we get a pair of jeans it seems that they have holes. I have to say, I don’t particularly care if my kid wears torn jeans, but winters here are cold and it just doesn’t work to have jeans with holes. We also get a bunch of hand me down jeans that were previously worn by a 6 year old boy and thus suffer from the same problem. The thought of forking over $12-15 (at a minimum) each for 8 pairs of jeans was more than I could bear.

So I figured I’d patch them, but add a little flair, too. Mind you, this takes some dedication. I HATE sewing. Mostly because I’m incredibly bad at it, and I don’t like to be bad at things. I got some of those iron-on patches, thread in a few colors, and a few fabric scraps.  Incidentally, it’s not that easy finding masculine fabrics–there’s lots of pink and ladybugs and purple chickens and tulips but not too may boy-friendly fabrics.

They turned out pretty nice!

The felt patch on the right hand one is already a bit frayed–I’m sure there’s some smart way to deal with that fabric that I’m unaware of. My favorite, though is the green car fabric that I found:

I wonder how long it will take for him to wear his way through these. I’m hoping it’s more than a week or two.

Etched Glass, PG version

So after my last foray into glass etching, one of my dear friends emailed me and requested a set of glasses with, shall we say, rather more profane words.

A crafting gauntlet had been thrown down! (Okay, that’s a bit dramatic. But I thought it would be fun and a nice present.)

I got some glasses from World Market and used the same techniques as last time, taking some inspiration from stuff I’ve been reading lately.

I took Jenn’s advice and left the etching cream on overnight this time.  This gave a much nicer result on the glasses.  Unfortunately, I forgot that I had left them out, so when the boy ran downstairs in the morning and yelled up the stairs, “Hey, Mom, what do these words say?!” I was, for the first time, incredibly grateful that his reading isn’t quite that fluent yet.

In keeping with the family-friendliness of this blog, I will leave to your imagination the other letters and words that I made.

Beware of what you suggest I craft in the comments, for it may end up on your doorstep.

Birthday!

The girl is 3! Unbelievable, really. I mean, look at this squashed up thing:

I love love love that little girl, but she was not a cute newborn. Sorry, sweetheart, if you’re reading this a few years later.

We threw a party for her, of course. I know she won’t entirely remember it but why shouldn’t she get to feel special for a day?

For the party, I got bags and wrote the kids’ names on them and had fabric markers at the party for them to decorate. Honestly, this didn’t work very well since once there as more than 2 children they all started running around like crazies. But it was a cute idea, no?

I made the paper circle garland in the pic above, using a 2 1/2″ craft circle punch, cardstock and some twine. I love it! We haven’t actually been able to make ourselves take it down yet, we like it so.

I’ve really been trying to avoid all the waste that often goes into these parties. From the paper or plastic goody bags (replaced by the canvas ones described above) to the junky plastic toys that are handed out at them, there’s just so much that ends up in the trash it’s appalling. For party favors, I cribbed one of the ideas I crowdsourced on facebook–painting terracotta planter pots with chalkboard paint, giving out chalk, dirt pellets and seeds.

I let my kids have at them before the party, and they loved them! I hope all the other kids had as much fun with them.

and for my fancy little girl, a Fancy Nancy cake!

So very cute. I ordered it from a local bakery to whom I gave minimal instructions and it was just lovely.

As for the party itself, I was of course running around and not very focused on getting pictures–I left that to the grandparents.

In a rather random twist of present-ing fate, my parents bought the girl an umbrella in China for her birthday. My mother-in-law sent a box with a raincoat and rainboots. All of this was completely unplanned, yet happened to be the exact same set. The girl could NOT have been more thrilled.

Happy Birthday, little girl.  May you always feel as beautiful as you do in your pink rain gear, whiskers painted on your face.

Prost!

I only buy Bonne Marie jam or jelly only partly because the jam is quite tasty.  The real reason is that I think that those particular jars make nice drinking glasses. As a side benefit, it’s exactly a 4 oz. pour to the top of the bumps.

Now, I have been teased about my use of jam jars as wine glasses(*cough* susan *cough*), so I thought I’d try to dress them up a bit.  I saw a bit on glass etching in a recent issue of ReadyMade, and thought it would be perfect. The hardest part was figuring out exactly what to etch on them–I finally settled for “cheers” in different languages after seeing that done on glasses at cb2.

It took some looking to find letters that  wanted–not too cutesy, curly, or otherwise fancified.  A nice, solid font sticker. The crap that was actually in the glass etching section was all ugly as hell–stupid grape stencils or wedding motifs. Why do people think that “crafty” also means “chintzy”? I ended up using the “remarks” letter stickers in the “jfk neutral” series–a cool bold sans serif. I did feel some embarrassment at buying scrapbooking supplies, and ducked out of the store as quickly as possible.

I followed the instructions as in the article–first I spelled out the words, then bordered them with masking tape, then painted the entire inner area with glass etch.


As you can see, I wasn’t terribly particular about getting them exactly straight. This is partly because the children, who had been playing downstairs nicely at first, decided to come inspect what I was doing.  Since there are big letters warning of death if you touch the etching cream with your bare hands, I spent much of the time yelling trying to get them to stay away and also to work as quickly as possible, so precision went by the wayside. The first one I did I only let the etching cream sit on for about 60 seconds and for the rest of them I let it sit on for a good 10 minutes, though I can’t say there’s any discernible difference between the two.  After rinsing them off, they looked like this:

Hmm…I think they look…okay…not amazing or anything.  But they are a bit more fun than plain jam jars and look pretty cool once they’re filled. I really like the idea, though I think it might look better on a smooth sided glass and if I do this again I’d make sure to put a much heavier layer of the etching cream on because these turned out a bit blotchy. Or maybe just do a design of polka dots or something…

The family escaped unscathed from the close encounter with etching cream, and last I checked, the wine is still just as tasty. Cheers!

Cold Day

Today DPS cancelled school because it was going to be zero degrees. There was a lot of whining about the school closures on Facebook, especially from people who grew up in Wisconson and such, where they only close schools if the Packers lose and everyone is too depressed to do anything. Me personally, I’m happy to keep my kids out of weather that causes frostbite in 5 minutes.

On snow days, Eric usually stays home with the kids because his college closes as well. This time, they stayed open so I took off my 2nd day of work ever. When I don’t work, other people have to do the work I would have done, so I felt a lot of guilt about not going in, even though it’s not particularly busy right now. Then I felt guilty for feeling guilty about work and not putting my kids first. Do mommies get a guilt break, ever?

During the day so far, I think the girl has averaged about one time out per half hour because she screams when she doesn’t get what she wants. Screams. My ears hurt. I began to wish that school had just stayed open, frostbite be damned, because I just couldn’t take the screaming anymore. I know, I know, I’m terrible.

That all being said, we’ve done some fun crafty things and in some ways it’s been nice to be holed up with them, warm and cozy.

We started by making a paper snowflake garland. I had to look up how to do this, having forgotten from my childhood. It was so much fun! The boy loved doing this, and so did I. The girl did a few but got bored pretty quickly and found other pursuits.

Watching the snowflakes unfold was the most fun part!

These:

Turned into these!

Then we took some dental floss and clear tape and made a garland to hang in front of our fireplace. I think it looks just lovely–you can click to enlarge. (Full disclosure–prior to this picture, I took off of the mantelpiece: An entire deck of Uno, packing tape, 2 pairs of scissors, twine, a small stuffed animal, an old glass of water and and a knitting book.  It doesn’t really look that tidy all the time)

Then we started baking and made some cookies. The girl got sent to rewash her hands about every FIVE MINUTES because she kept licking them. I can’t attest that all cookies are 100% germ free. The baking has to kill most of them, right?

I chose thumbprint cookies thinking that there were a lot of steps they could participate in. Both kids had a lot of fun sifting flour and watching the mixer. They got a bit bored with making the dough into balls, but loved rolling them in coconut and finally thumbprinting. So, so tasty.

It is now, gratefully, naptime.

Now all I need to do is come up with some ideas for the afternoon….